Web Designer
Web Designer is how you build the front of your application. It opens any HTML page your cloudlet serves and lets you edit it the way you would edit a document - click an element to select it, double-click a run of text to rewrite it, drag a block in from the palette, and drag it somewhere else to move it.
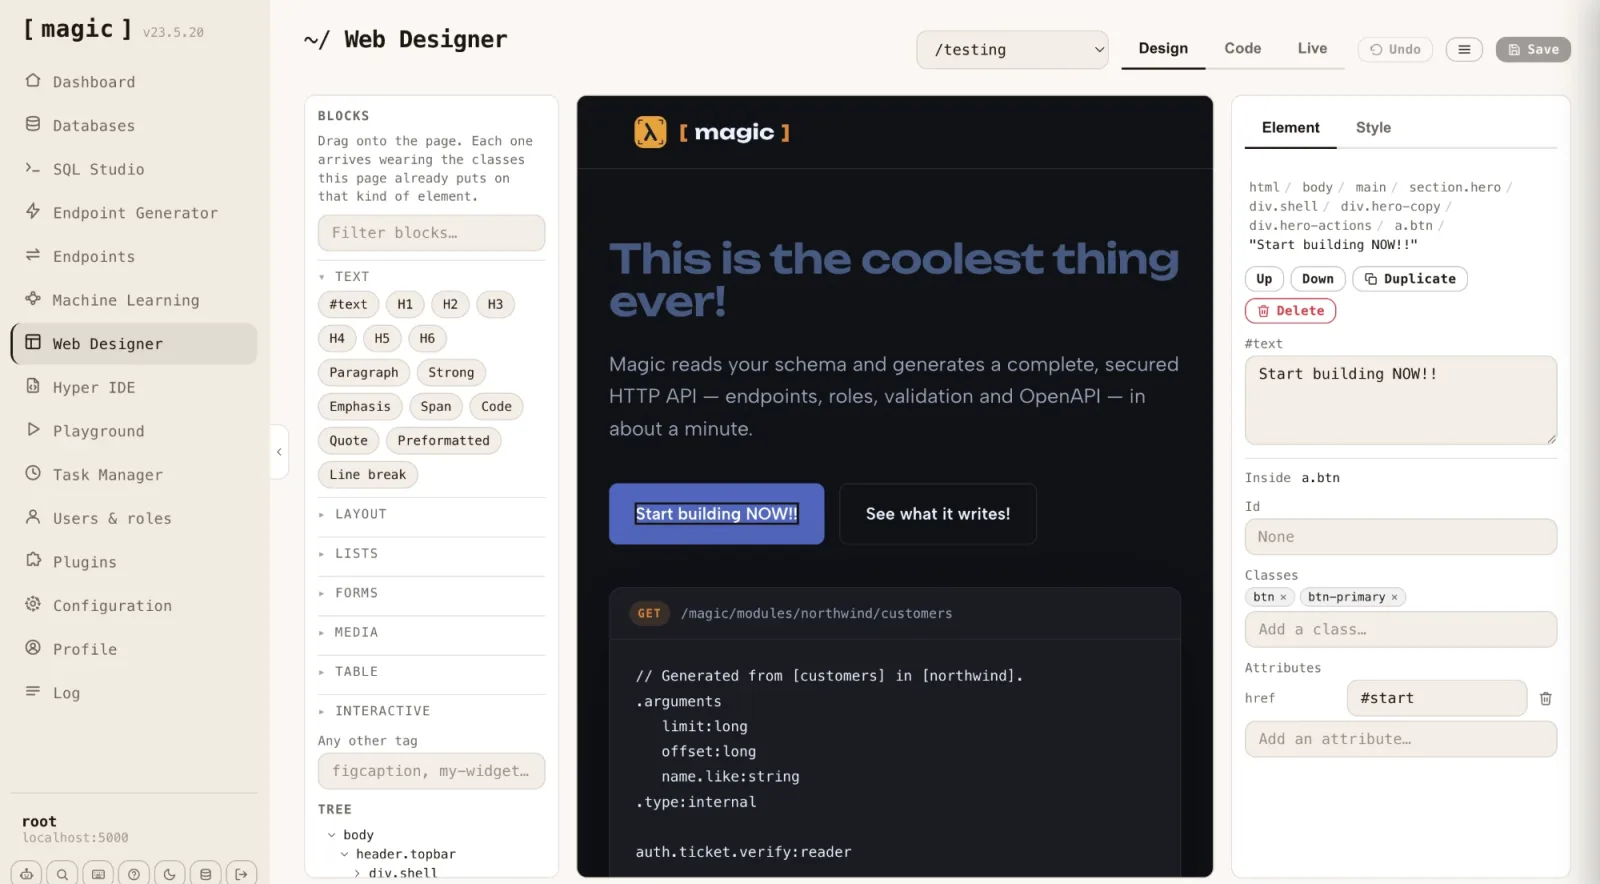
There is no project format, no component model and no build step. The page in the middle is the file on disk. When you save, what the browser parsed is written back as HTML - which is why a page built by an AI agent, scaffolded by a wizard, or hand-written years ago can all be opened and edited here without conversion.
Choosing a page
The dropdown at the top lists every HTML page below your cloudlet’s web root. Pick one and it opens, remembering your choice for the next time you come back.
To make a new one, open the menu beside the view tabs and choose “New page”. You give it the URL you want it served at - /pricing becomes pricing.html - and either start from a blank page or copy the page you currently have open. Folders are never invented for you; a URL with steps in it, such as /docs/intro, creates those folders because it has to, and nothing else does.
The three views
Design is the editor. The page is rendered exactly as a visitor sees it, but with scripts disabled, so nothing moves under you while you work and the document cannot rewrite itself between your edit and your save.
Code puts the same file in a code editor, with syntax highlighting, and a dropdown for switching between the page and any stylesheet the page links from this cloudlet. Below the editor sits the prompt bar where “the Machine Creates the Code” - describe what you want and the generator writes it into the file you have open. Save before switching files in this view; the editor holds one file at a time and will tell you rather than quietly discard what you typed.
Live loads the page from its real URL with scripts running, inside the dashboard, so you can check behaviour without leaving the component. The “Preview” item in the menu opens the same URL in a new browser tab.
A width control lets you narrow the canvas to a phone or tablet width, so you can check a responsive layout in place.
Selecting things
Click anything to select it. The panel on the right shows the path from html down to what you picked, and the tree below the palette shows the same document as a nested list - hover a row and the element lights up on the page, double-click it and the page scrolls smoothly to bring it into view.
Text is selectable in its own right. A run of words inside a paragraph is a #text node in the tree, not a property of the paragraph, so a heading that mixes text with an icon and a link is three separate things you can select, move and delete independently. Selecting a text run styles its parent, since text itself carries no styling.
Adding and moving blocks
The palette holds over sixty blocks, grouped by what they are for - text, layout, lists, forms, media, tables and interactive elements - with a filter box above them and an “Any other tag” field for anything not in the list, including web components.
Blocks do not arrive unstyled. Each one reads the page it is being dropped into and wears the classes that page already puts on that kind of element, judged first by what sits around the drop point and only then by the page as a whole. Drop a button into the navbar and it arrives dressed as a nav item; drop the same button into the header and it arrives as the primary action.
Drag any element on the canvas to move it. A line shows where it will land, and elements that cannot take children are never offered as a destination. The Up, Down and Duplicate buttons in the Element panel do the same job in single steps, and Delete - or the Delete key - removes what is selected.
The Element panel
With something selected, the Element tab gives you its id, its classes as removable chips with a box for adding more, and every attribute on the tag with a field for adding another. This is where a link gets its destination, an image its source and alt text, and an input its name and placeholder.
Selected text gets a #text box instead, holding exactly the characters in that run. Editing there is the same as double-clicking the text on the canvas and typing.
The Style panel
The Style tab writes real CSS into the page’s own stylesheet. At the top you choose which selector you are styling - the element’s own classes, its id, or its tag - so a change can apply to one element or to every element that shares its class.
Everything the designer writes goes into a fenced block at the end of the stylesheet, between an opening and a closing marker comment. Your own CSS above and below the fence is carried back to disk as the text it arrived as, so hand-written rules, comments and media queries survive every save. Inside the fence, rules are rewritten each time, which is why the opening marker carries a warning telling you not to hand-edit that region.
Values are validated rather than corrected. Type a length the browser cannot parse and the field turns red when you leave it, keeping what you typed so you can fix it, instead of silently reverting.
When a stylesheet changes, its <link> in the page gets a new version stamp on save. Magic serves static files with a long cache lifetime, so without that stamp your own browser would keep showing you yesterday’s CSS.
Saving
Save writes the page, and the stylesheet too when styles changed. The HTML is re-emitted tidily indented from the document you have been editing; in the Code view, what you typed is written through exactly as typed, because there the text on screen is the file and reformatting it under you would be rude.
Undo steps back through your edits, including style changes.
Working with Chat Ops
Web Designer and Chat Ops are meant to be used together. Ask Chat Ops to restructure a section, generate a new page, or rewrite some copy, and when the turn finishes the designer reloads the page you have open so the result is on the canvas immediately. Broad, structural changes are faster to ask for in words; small, precise ones are faster to point at and drag.
What it is not
It is not a site builder with its own runtime. There is no proprietary page format to export from, nothing is compiled, and the file you edit here is the file your visitors download. A page whose content is built entirely by JavaScript at load time will therefore look empty in the Design view - correctly so, because that is what the file actually contains. Use the Live view for those, and edit the script that builds them in Hyper IDE.
Keyboard shortcuts
Press CTRL+/ (COMMAND+/ on a Mac) anywhere in the dashboard for the full list. In Web Designer, Delete removes the selected element, and the standard save shortcut writes the file from either the design canvas or the code editor.